What is a Bevel Cut With a Miter Saw?

A bevel cut with a miter saw is an angled cut made across the thickness of a material. It differs from a straight cut in its angled edge profile.
Mastering the use of a miter saw for bevel cuts is a cornerstone skill in carpentry and woodworking, enabling precision in creating joints for frames, boxes, and more complex structures. The miter saw’s adjustable blade allows crafters to make accurate bevel cuts ranging from a slight angle to a sharp slant, essential for snugly fitting corners and edges.
This versatility extends the tool’s utility, making it a go-to for professionals and hobbyists alike. Employing a miter saw for bevel cuts not only enhances the aesthetic of finished projects but also ensures structural integrity where angled joints are critical.

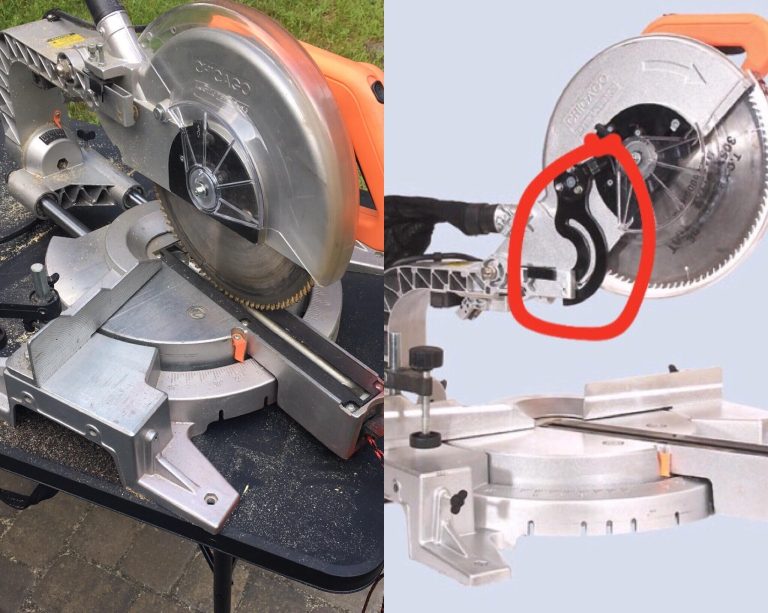
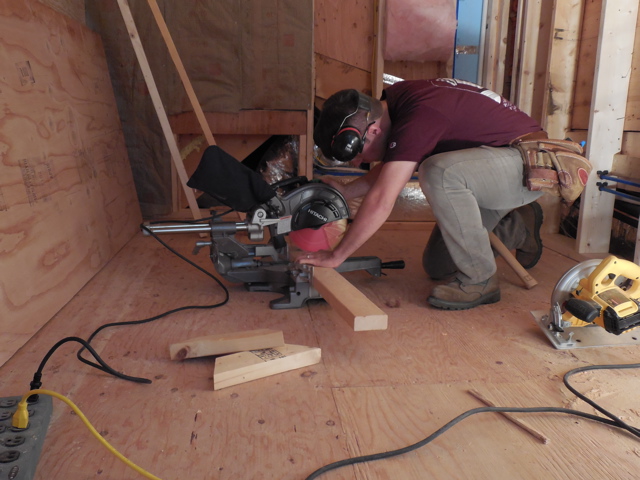
Credit: www.toolboxbuzz.com
Introduction To Bevel Cuts
Embark on a crafty journey through the world of woodworking where precision and versatility meet—welcome to the art of bevel cutting with a miter saw. This technique transforms simple pieces of wood into intricate components of joints and edges that embody the essence of meticulous craftsmanship. Bevel cuts are the unsung heroes of angular cutting, offering a dimension of depth to projects that cannot be achieved with regular straight cuts.
Defining The Bevel Cut
Picture an edge that gracefully inclines away from a perfectly square edge—this is the essence of a bevel cut. Unlike standard cuts which run perpendicular to the material’s surface, a bevel cut skews the cut line at an angle that is not 90 degrees with respect to the face of the material. It requires an adept hand and a powerhouse tool—the miter saw. When executed correctly, bevel cuts can interlock to craft joints with superior strength and aesthetic appeal.
Understanding The Miter Saw’s Capabilities
The miter saw, a powerhouse in the world of woodworking, is designed for the express purpose of executing precise cuts. Its ability to adjust both the angle and the tilt of the cutting blade allows craftsmen to create bevel cuts with unmatched precision. With a miter saw, you can tilt the blade to your desired angle setting, lock it in place, and then cut the wood according to the specifications of your project, thus ensuring a clean and accurate bevel.
Comparison Of Bevel Cuts With Other Types Of Cuts
| Type of Cut | Description | Typical Use |
|---|---|---|
| Bevel Cut | An angled cut with respect to the material’s face | Joining, edging, and artistic applications |
| Miter Cut | An angled cut with respect to the edge of the material, typically across the material’s width | Corners of frames or boxes |
| Crosscut | A straight cut at 90 degrees to the material’s length | Shortening or dividing a workpiece |
| Rip Cut | A straight cut along the length of the material | Reducing width or creating boards |
Distinguishing between these cuts is critical for selecting the right technique for your project. Bevel cuts particularly stand out for their ability to create complex joinery and decorative edges, which other cuts cannot achieve with the same degree of finesse.
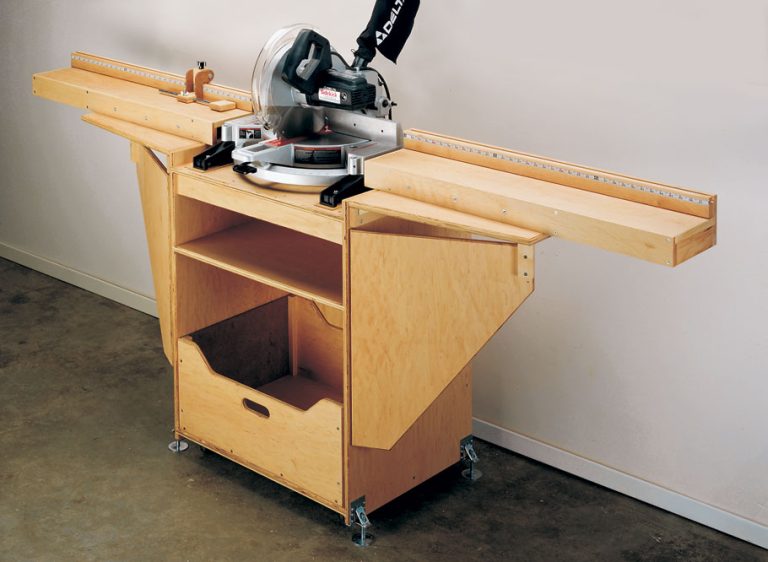
Setting Up For A Bevel Cut With A Miter Saw
The miter saw is a powerful tool in the carpenter’s arsenal, prized for its precision and versatility. Venturing into the realm of bevel cutting expands its repertoire, allowing the user to execute angled cuts on the edge of a piece of work. Perfecting the setup for a bevel cut involves meticulous preparation, proper equipment, and an unwavering dedication to safety. Let’s delve into the essential steps required to conquer the art of bevel cutting with a miter saw.
Essential Tools And Safety Gear
Embarking on any woodworking project begins with gathering the necessary tools and prioritizing safety. To position yourself for success while preparing for a bevel cut, ensure you have the following:
- Powerful Miter Saw – Your go-to tool, capable of tilting to produce the desired bevel angle.
- Sharp Blade – A blade designed for your material ensures a clean cut.
- Carpenter’s Square – For verifying angles and ensuring precision.
- Clamps – To steadfastly secure the material during cutting.
- Measuring Tape and Marker/Pencil – Essential for accurate measurements and markings.
Safety can’t be an afterthought, so gear up with:
- Safety Goggles – Protect your eyes from flying debris.
- Ear Protection – Miter saws are loud, and hearing safety is a must.
- Dust Mask or Respirator – Keep breathing zones clear of sawdust.
- Work Gloves – To safeguard your hands.
Preparing The Miter Saw For Bevel Cutting
Before making any cuts, calibrate your miter saw for accuracy:
- Disconnect the saw from its power source to prevent accidental starts.
- Pivot the saw’s blade to the desired angle using the bevel gauge as a guide.
- Lock the bevel adjustment in place to ensure the angle remains constant throughout the cut.
- Inspect the blade for sharpness and cleanliness, replacing it if necessary for optimal performance.
Joining precision with caution ensures both successful cuts and personal safety. Double-check each setting and remember to reconnect the saw only when the setup is complete.
Measuring And Marking The Material
Accurate measurement and marking form the foundation of a successful bevel cut. Follow this structured approach:
- Use your measuring tape to determine the length of the cut, and mark the material with precision.
- Lay the carpenter’s square across the workpiece to extend the line along the desired edge, ensuring it’s square for true angles.
- Secure the material firmly against the miter saw’s fence, using clamps if necessary to prevent movement during cutting.
With these preliminary steps, your setup is complete, and you are ready to make that flawless bevel cut. Attention to every detail ensures that the results not only look professional but also fit precisely as intended. Onto the saw, for the art of the bevel awaits!
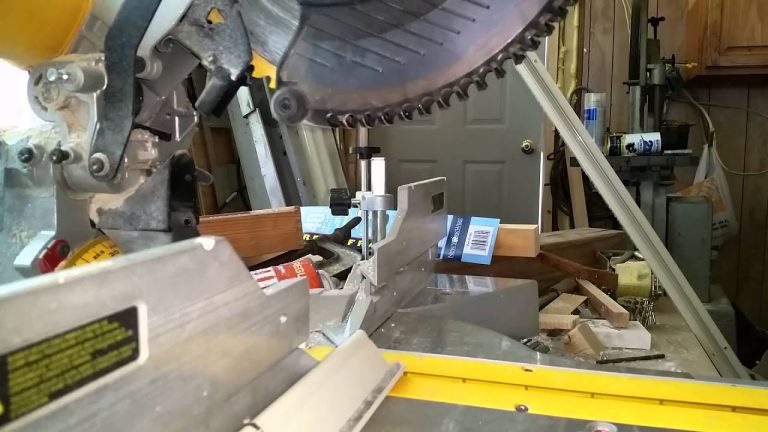
Executing The Bevel Cut
Mastering the art of the bevel cut is a game changer for any woodworking aficionado or DIYer. It’s a fundamental skill when you’re aiming to create joints with seamless angles, such as picture frames or crown molding. Let’s hone in on the process of Executing the Bevel Cut using a miter saw. This precision tool allows you to tilt the blade to slice through the material at your desired angle, resulting in a cut that is not perpendicular to the top of the material.
Step-by-step Guide To Making A Bevel Cut
Bevel cuts transform simple projects into tailored pieces. Follow this step-by-step guide for impeccable results:
- Prepare Your Miter Saw: Ensure your miter saw is clean, stable, and that the blade is sharp. Adjust the bevel control to set the blade to your desired angle.
- Measure and Mark Your Workpiece: Accurately measure and mark the cutting line on your work material.
- Secure the Workpiece: Clamp your material in place to prevent any movement during the cutting process.
- Set Blade Angle: Adjust the saw blade to the angle required for your bevel cut. Be aware of the difference between the bevel angle and the miter angle.
- Make the Cut: Start the saw and allow it to reach full speed before you begin cutting. Gently guide it through the material to produce a smooth and precise bevel.
- Check the Cut: Once made, verify the accuracy of your cut with a protractor or angle finder before continuing with your project.
Common Mistakes And How To Avoid Them
- Incorrect Blade Angle: Double-check the blade angle before cutting. A simple mistake here can ruin the piece.
- Forgetting to Clamp: Always secure the material to avoid any movement that can cause inaccuracies.
- Pushing Too Hard: Let the saw do the work. Pushing too hard can damage the material or cause a kickback.
- Not Using a Sharp Blade: A dull blade can lead to rough cuts. Keep your blades sharp for the cleanest cuts.
Tips For Achieving Clean And Accurate Bevel Cuts
Attaining the perfect bevel cut can be effortless with these tips:
- Use Quality Blades: Invest in high-quality blades suited for the material you are cutting.
- Perform Test Cuts: Always do a few test cuts on scrap material to ensure that your settings are correct.
- Keep It Steady: Maintain even pressure and a steady hand throughout the cut.
- Lighting Matters: Good lighting helps you follow your cut line accurately.
- Check Your Equipment: Regular maintenance of your miter saw ensures reliability and precision.

Credit: abutterflyhouse.com
Advanced Bevel Cutting Techniques
Advanced Bevel Cutting Techniques are the hallmark of a seasoned woodworker, allowing for the creation of intricate designs and tight joinery that are both functional and aesthetically pleasing. Whether you’re an experienced professional or an ambitious DIY enthusiast, mastering the artistry of bevel cuts with a miter saw can elevate your woodworking projects to new heights. While a straight bevel cut is relatively straightforward, complex projects often require advanced skills. Below, we explore techniques to expand your repertoire and ensure precision in every cut.
Making Compound Angle Cuts
Compound angle cuts combine a bevel angle with a miter angle, making them essential for crown molding, picture frames, and more complex woodworking projects. These cuts require careful calculation and an understanding of both the material and the miter saw. To execute a successful compound cut:
- Set the miter angle on your saw table.
- Adjust the bevel angle on the saw blade according to your project’s specifications.
- Secure the workpiece and make the cut in one smooth motion.
Always double-check your measurements and angles before cutting, as compound cuts are less forgiving than simple bevel cuts.
Working With Different Materials And Thicknesses
The right technique when dealing with various materials and thicknesses can mean the difference between a clean cut and a wasted piece. Here are some tips to handle diversity in materials:
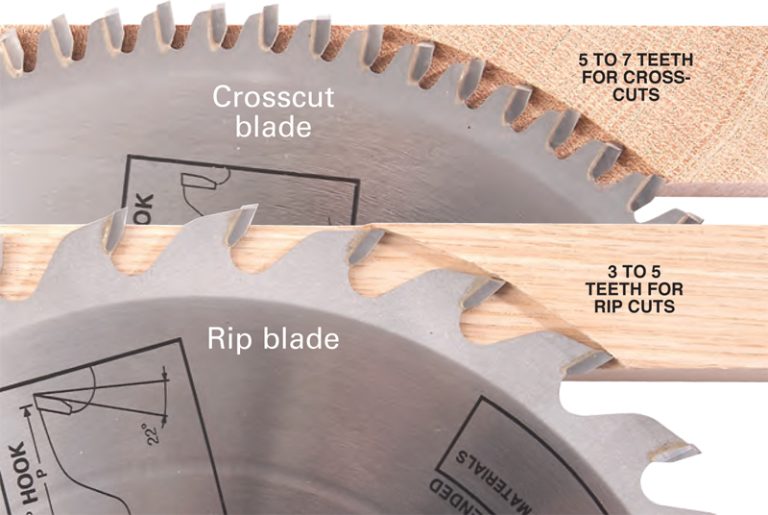
| Material | Tips for Bevel Cutting |
|---|---|
| Softwoods | Use a sharp blade with more teeth for a smoother cut. |
| Hardwoods | Opt for a blade with fewer teeth to reduce burn marks. |
| Plywood | Apply masking tape over the cut line to prevent splintering. |
| Thick Material | Perform multiple passes, gently deepening the cut each time. |
Remember to adjust your saw’s speed according to the material’s hardness and thickness to avoid damage to both the material and the blade.
Creating Joinery With Bevel Cuts
Joinery is the cornerstone of woodworking, and bevel cuts are particularly useful for creating tight, seamless joins. Follow these steps for cutting joinery:
- Determine the type of joinery (e.g., miter joint, scarf joint, French cleat) suited to your project.
- Configure the bevel angle accurately to match the joint requirements.
- Make test cuts on scrap wood to ensure precision before moving on to the actual workpiece.
- Gradually refine the angles and cuts until the two pieces fit together perfectly.
Whether for structural purposes or visual appeal, deliberate and precise bevel cuts are essential for creating effective joinery.
Maintenance And Troubleshooting
An integral part of achieving precision with a miter saw involves maintaining it properly and knowing how to troubleshoot potential issues. Regular maintenance can prevent problems before they start, and effective troubleshooting can save both time and materials. This segment specifically dives into ensuring your miter saw is always ready for a clean, accurate bevel cut.
Keeping The Miter Saw In Optimal Condition
To guarantee that your miter saw executes flawless bevel cuts, you need to follow a routine maintenance schedule. Here are some key steps:
- Regular Cleaning: Dust and debris buildup can affect accuracy. Clean the saw after each use.
- Lubrication: Periodically lubricate moving parts to ensure smooth operation.
- Inspection: Regularly inspect for loose bolts, worn cords, or damaged components.
- Alignment Check: Verify that the blade and fence are perfectly aligned to maintain precision.
Troubleshooting Common Issues During Bevel Cutting
Encountering difficulties while making bevel cuts with your miter saw? Here’s how to identify and fix common problems:
| Issue | Cause | Solution |
|---|---|---|
| Unsmooth Cuts | Dull Blade | Sharpen or replace the blade. |
| Inaccurate Angles | Calibration | Check and adjust the bevel gauge. |
| Blade Slippage | Loose Bolts | Tighten the blade bolt and spindle. |
| Saw Won’t Start | Power Issue | Ensure the saw is plugged in and the fuse is intact. |
When To Sharpen Or Replace The Blade
A bevel cut’s precision greatly depends on the condition of the saw blade. Keep an eye out for these signs:
- Burn Marks on Wood: Indicates the blade may be dull and requires sharpening or replacement.
- Rough Cuts: Suggests the teeth may be damaged. Inspect and consider replacing the blade.
- Difficulty Cutting: If the saw struggles to cut, the blade could be dull or the wrong type for the material.
- Noise and Vibrations: Excessive noise or vibration can mean an unbalanced blade, necessitating a check.
It’s essential to have a routinely checked and well-kept blade to maintain the capability of your miter saw for accurate bevel cuts.

Credit: abutterflyhouse.com
Conclusion And Creative Applications
As we reach the culmination of our exploration of bevel cuts with a miter saw, we uncover a realm where precision meets creativity. Bevel cutting is an integral skill for any woodworker or DIY enthusiast looking to add dimension and complexity to their projects. Let’s dive into the applications and possibilities that bevel cuts unlock, solidifying our understanding of this transformative technique.
Summarizing The Versatility Of Bevel Cuts
Bevel cuts redefine the boundaries of woodworking, taking projects from simple to sophisticated. These angled cuts impart a professional touch to edges, frames, and joints. From crafting tighter joinery to enhancing the aesthetic of moldings, bevel cuts are synonymous with versatility. Their application extends beyond functionality, serving as a staple in intricate designs and complex constructions. Proficiency in making bevel cuts elevates a woodworker’s capability to navigate through diverse project requirements with confidence.
Innovative Projects Using Bevel Cuts
- Custom picture frames – Achieve a distinctive look with angled edges that draw the eye inward
- Architectural trim – Enhance the character of a room with precision beveled crown molding
- Furniture making – Create engaging, comfortable angles for chairs and other furnishings
- Decorative boxes – Fashion unique keepsake boxes with lid edges that close seamlessly
These examples just scratch the surface. Innovative creators consistently discover new ways to implement bevel cuts, pushing the envelope of woodworking artistry.
Continued Learning And Skill Development
Mastering bevel cuts with a miter saw is a journey. Regular practice and challenging new projects contribute to skill sharpening. Resources such as online tutorials, woodworking courses, and community workshops offer valuable insights into advanced techniques. Remaining curious and open to experimentation can lead to unexpected breakthroughs in bevel cutting proficiency. Embrace the learning curve and the limitless potential that bevel cuts offer to your crafting endeavors.
Frequently Asked Questions For What Is A Bevel Cut With A Miter Saw?
What Are 3 Types Of Cuts That A Miter Saw Makes?
A miter saw can perform three main types of cuts: crosscuts, which cut across the wood grain; miters, which are angled cuts; and bevel cuts, angled along the board’s edge.
What Is The Difference Between A Compound And A Bevel Miter Saw?
A compound miter saw can make bevel cuts in addition to miter cuts. A bevel miter saw, also known as a single-compound miter saw, is limited to miter and single-direction bevel cuts.
How Do You Adjust The Bevel On A Miter Saw?
Unlock the bevel adjustment knob on your miter saw. Tilt the saw blade to your desired angle. Refer to the angle indicator for precision. Retighten the knob to secure the blade angle. Double-check the setting before making cuts.
What Is The Angle At Which A Bevel Is Cut?
The angle for a bevel cut typically varies from 15 to 45 degrees, depending on the project requirements.
Conclusion
Mastering the bevel cut with a miter saw unlocks endless possibilities in woodworking and DIY projects. With precision and the right techniques, your angled cuts can transform simple materials into intricate designs. Let this guide be your companion as you refine your miter saw skills, ensuring every bevel cut enhances your creations beautifully.
Keep practicing, stay safe, and watch your craftsmanship soar.
{ “@context”: “https://schema.org”, “@type”: “FAQPage”, “mainEntity”: [ { “@type”: “Question”, “name”: “What are 3 types of cuts that a miter saw makes?”, “acceptedAnswer”: { “@type”: “Answer”, “text”: “A miter saw can perform three main types of cuts: crosscuts, which cut across the wood grain; miters, which are angled cuts; and bevel cuts, angled along the board’s edge.” } } , { “@type”: “Question”, “name”: “What is the difference between a compound and a bevel miter saw?”, “acceptedAnswer”: { “@type”: “Answer”, “text”: “A compound miter saw can make bevel cuts in addition to miter cuts. A bevel miter saw, also known as a single-compound miter saw, is limited to miter and single-direction bevel cuts.” } } , { “@type”: “Question”, “name”: “How do you adjust the bevel on a miter saw?”, “acceptedAnswer”: { “@type”: “Answer”, “text”: “Unlock the bevel adjustment knob on your miter saw. Tilt the saw blade to your desired angle. Refer to the angle indicator for precision. Retighten the knob to secure the blade angle. Double-check the setting before making cuts.” } } , { “@type”: “Question”, “name”: “What is the angle at which a bevel is cut?”, “acceptedAnswer”: { “@type”: “Answer”, “text”: “The angle for a bevel cut typically varies from 15 to 45 degrees, depending on the project requirements.” } } ] }